How to tunnel ExpressVPN (and other VPNs) over a Shadowsocks proxy (OpenVPN over SOCKS5). Instructions for Windows and Mac.
Import Update
ExpressVPN ended support for OpenVPN TCP manual configurations on June 30, 2019.
As it’s not possible to tunnel UDP over Shadowsocks, that means it is no longer possible to tunnel ExpressVPN over Shadowsocks.
If you need to tunnel OpenVPN over Shadowsocks for increased VPN speed from China, then I recommend using Surfshark or NordVPN. They both provide full support for manual OpenVPN TCP connections.
Surfshark 2 Year Deal
Get 2 Years of Surfshark for only $59
Special Offer for NordVPN
NordVPN always has a good deal on for a 2 or 3 year plan. Check the current best available deal below.
I will leave this guide up for historical purposes and replace it with a new guide for Surfshark or NordVPN when I have more time.
If you want to follow this guide now for Shadowsocks over OpenVPN with NordVPN or Surfshark (or other VPNs with support for manual OpenVPN TCP), please note the following.
You can download the TCP configurations files directly with Surfshark or NordVPN, there is no need to modify a UDP file for TCP. You do not need to change the port number, or add the proto-tcp line, or remove the fragment directive.
You only need to make the following changes to a native OpenVPN TCP file.
- Add the line socks-proxy 127.0.0.1 1080 (or change the port to 1086 if using Mac)
- Add the line block-outside-dns (if using Windows 10)
All of the other steps are exactly the same.
NOTE – If you are just looking for fast internet connection in China, it is not necessary to do all of this.
Rather, you can carefully choose a one of the best VPNs to use in China. But that is not enough by itself. You also need to choose the right server to connect to for high performance in China. Check the 2020 VPN in China blog page to see which servers can offer high performance in China.
Tunelling OpenVPN over shadowsocks is a great way to improve the speed of servers that are not normally fast in China, or can’t be connected to from China at all.
For example, sometimes the USA servers that work for streaming Netflix in China are not fast enough for reliable streaming during peak bandwidth hours at night. This is a good example of when it’s useful to tunnel OpenVPN over Shadowsocks.
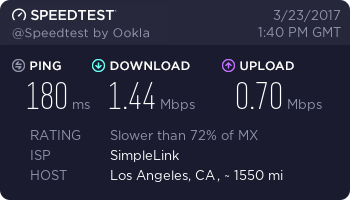
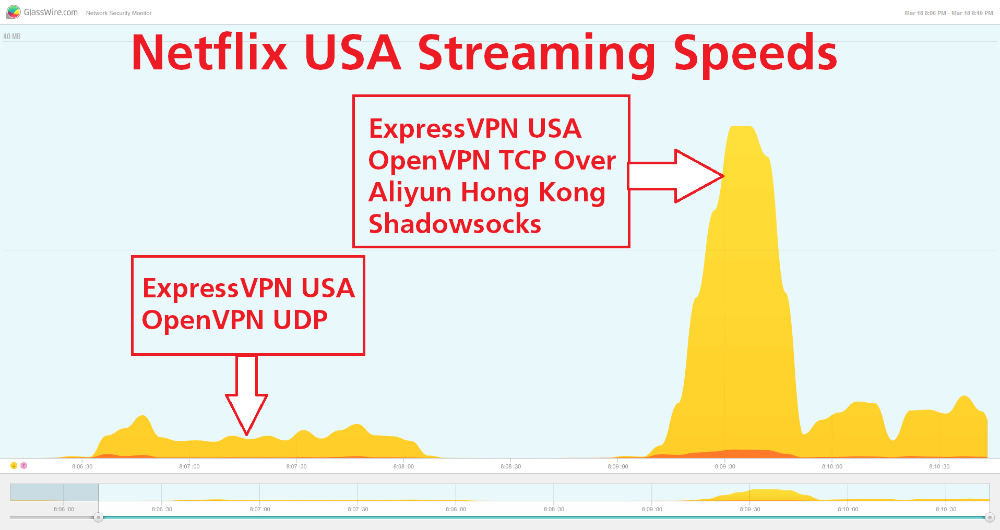
For example, here is the speed of the ExpressVPN Los Angeles server during peak hours at night (9:30pm) when the international bandwidth in China is severely congested.
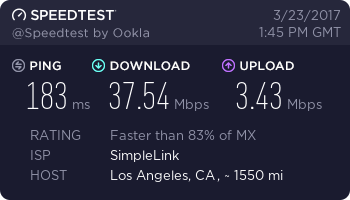
Here is the speed of the same server, just a few minutes later, after I tunneled the connection over my Aliyun Hong Kong Shadowsocks server.
In addition to providing better speed on servers that do not normally perform well in China, there is another use case for OpenVPN over Shadowsocks.
Shadowsocks, by itself, can offer really good speeds. But it lacks the security, privacy, and anonymity of a real VPN.
By combining the speed of Shadowsocks with an actual VPN, you get the best of both worlds.
This tutorial was written using ExpressVPN, but should also work with other VPN providers, as long as they allow OpenVPN TCP connections using a third party OpenVPN client. Some VPN providers, such as VyprVPN, do not support TCP connections, and therefore, will not work.
I have done this with many different VPNs and shadowsocks servers and the best combination that I have found is ExpressVPN + Alibaba Cloud (Aliyun) Hong Kong.
If you don’t already have a Shadowsocks server, check my tutorial on how to set up your own shadowsocks server first. Alternatively, if you prefer to use a paid Shadowsocks service, I recommend WannaFlix.
Special Offer for WannaFlix
30% OFF your first billing cycle (valid for all plans)
Tip – Use the Hong Kong WannaFlix server for the best performance when tunneling an OpenVPN connection.
If you already have a Shadowsocks server set up and a VPN service that allows manual OpenVPN TCP connections, let’s get started.
This tutorial is written for Windows users, but there are some notes at the bottom of the page for MacOS users.
Step 1 – Download and install a third party OpenVPN client
Although some VPN providers, such as TorGuard, have the function in their dedicated apps to tunnel an OpenVPN connection over a SOCKS5 proxy, most providers don’t offer this. To tunnel an ExpressVPN connection over shadowsocks, we will need to use a third party OpenVPN client. Here are some options.
Windows – OpenVPN (free)
Mac – Tunnelbick (free)
Windows and Mac – Viscosity ($9, free trial for 1 month)
For this tutorial, I will be using the free OpenVPN client for Windows. I am using the newest version, which is version 2.4.1 at the time of writing this tutorial.
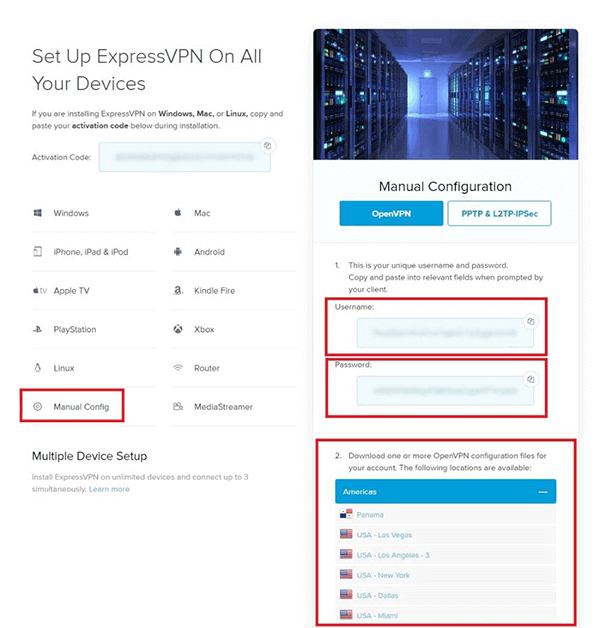
Step 2 – Download the manual OpenVPN config files
Go to the ExpressVPN website and click My Account to log into your account and then choose the link Set up ExpressVPN. Now choose Manual Config and download the .ovpn files for the server locations that you wish to connect to. For this tutorial, I will use the Los Angeles server. Keep this page open because you will need to copy the username and password later.
Step 3 – Modify the .ovpn file(s)
We will need to make some modifications to the .ovpn file.
First, we need to change the protocol to TCP because tunneling OpenVPN over shadowsocks will not work with UDP, even if you have enabled UDP forwarding on your shadowsocks server.
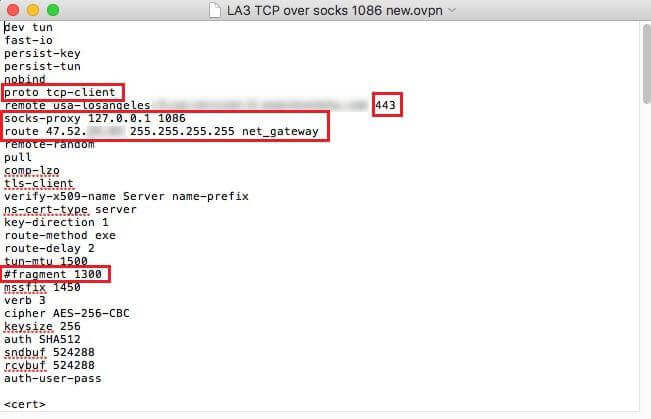
ExpressVPN doesn’t officially support OpenVPN manual config files for TCP connections, but they do have TCP enabled on their servers on port 443, so we just need to make a few changes.
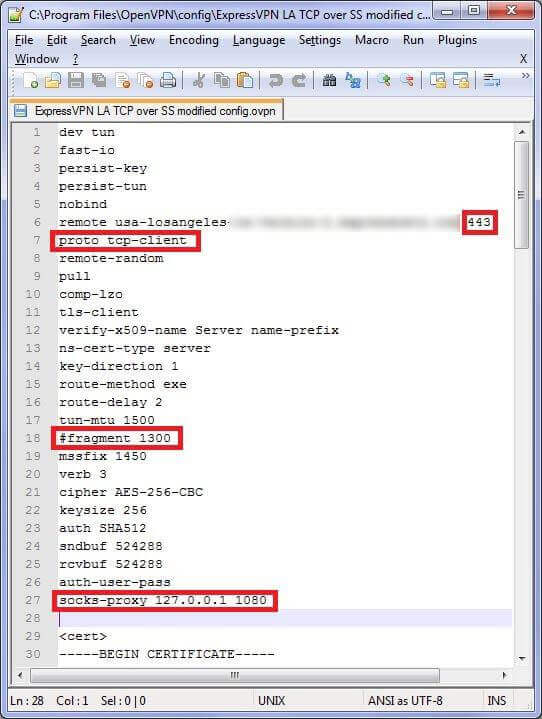
- On the line that starts with “remote”, change the port number from 1195 to 443.
- Add a new line with the text proto tcp-client.
- Remove (or comment out with a # symbol) the line that says fragment 1300 (this option is for UDP only).
If you are using another VPN provider that provides OpenVPN config files for TCP, then you can skip the above steps because the file will already be configured for TCP.
Next, we need to add some lines telling the OpenVPN client to tunnel the connection over our SOCKS5 proxy (shadowsocks server in this case). Add the following line.
socks-proxy 127.0.0.1 1080
If you have followed the instructions correctly, your .ovpn config file should look like this.
Update – After writing this tutorial, I got some feedback from someone who had a DNS leak using Windows 10. If you are using Windows 8 or Windows 10, you may need to add one more line to the config file to stop DNS leaks.
Add the following line (not shown in the above photo) if you are using Windows 10.
block-outside-dns
This paramter to block outside DNS requires OpenVPN version 2.3.9 or higher. You may need to update your OpenVPN client if you are using an older version. Alternatively, you can use this plugin for older versions.
Step 4 – Save the .ovpn file to the OpenVPN client config folder
If you are using the OpenVPN client for Windows, save the .ovpn file(s) to the config folder located in the OpenVPN installation directory. In my case, the folder is located here.
C:\Program Files\OpenVPN\config
I have also renamed the file so I can easily identify the connection. I have named it “ExpressVPN LA TCP over SS modified config.ovpn” so I don’t confuse it with a normal OpenVPN connection. Whatever you name this file is what will be shown in the OpenVPN client.
If you are using Viscosity, then you can save the file anywhere and then right-click the saved .ovpn file and open it with Viscosity to import the connection profile.
Step 5 – Open the Shadowsocks client and choose a server
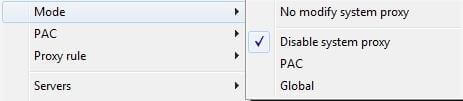
Open the Shadowsocks client and choose your desired server, but do not enable the system proxy. The shadowsocks proxy is always running when the client is open, even when the system proxy is disabled. We want to leave the system proxy disabled because we are using the VPN connection.
For example, I am using the ShadowsocksR client for Windows, and I have disabled the system proxy by choosing Mode –> Disable system proxy.
Step 6 – Connect
The specific steps will depend on your OpenVPN client. For the OpenVPN Windows client, launch the OpenVPN GUI program, then right-click the icon in the taskbar, find the server name (name of the saved .ovpn file), and then choose connect.
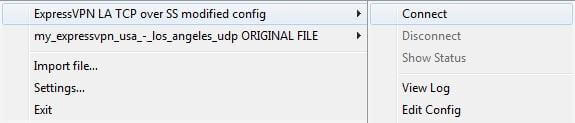
Note – If you only have one .ovpn file in your config folder, then just right-click the icon and choose connect, you won’t see the name of the .ovpn file.
The first time you connect, you will be prompted to enter your username and password, which you can copy from the ExpressVPN setup page shown in step 2 (or the credentials area of your VPN provider)
If you want to share this very fast VPN over shadowsocks connection with other devices besides your computer, you can set up a virtual VPN router. That is what I am doing for Netflix on my Roku in China and the streaming speed is VERY FAST.
The below image shows my actual streaming speed on Netflix though the graph in my firewall software. On the left is the bandwidth graph before tunneling the ExpressVPN US server over my Aliyun HK shadowsocks server, and on the right is after.
Troubleshooting
If you get any connection errors, you can find the connection log in the folder located here (for the Windows OpenVPN client).
%USERPROFILE%/openvpn/log
If you are having trouble connecting, it might be a good idea to try the standard .ovpn config file first without making any changes in order to verify that you can successfully connect using the standard OpenVPN configuration from your provider. If you can’t connect with the standard config, contact your VPN provider for assistance.
Instructions for MacOS?
It took a long time to figure out, but someone finally found the solution to do this on Mac and sent me an email.
Here are all of the differences for Mac compared to Windows.
1. Enable the option “turn shadowsocks on” and set the mode to “manual mode”.

2. In the OpenVPN config file, the added line is “socks-proxy 127.0.0.1 1086” because the local proxy runs on port 1086 for Mac.
3. An additional line is required as shown below (big thanks to website visitor Michael for finding the solution)
route x.x.x.x 255.255.255.255 net_gateway
Replace x.x.x.x with the IP address of your shadowsocks server.
Your config file should look something like this.
Thanks for your detailed instructions. Can we tunnel a VPN connection over shadowsocks with and Android device, I wonder?
@James
How to tunnel OpenVPN over shadowsocks on OpenWrt?
does anyone manage to get this done on openwrt?
“we will need to make some modifications to the .ovpn file”
okay, but how on earth do you do this? when i open the ovpn GUI and click ‘Edit Config’, it just opens in notepad, and looks nothing like the screenshot you have here. One or two more steps would be very much appreciated. Thanks in advance.
Hello dear friend.
Internet speed should be checked here
https://sourceforge.net/speedtest/?source=sfnet_header Good luck)))
Can you tunnel OpenVPN over SSR on iOS?
The way I’m reading this it appears that on Win/OSX you first connect to the SSR, followed by connecting to the OpenVPN? Does iOS support connecting to two VPNs at one time?
Hi. I’m trying to install the SSR server on a Raspberry Pi running the latest version of Raspbian (based on Stretch Debian). Teddy’s script is telling me that this OS is not supported. Is there any way around this?
Thanks.
Is there a way to just use Socks5 to bridge a connection to a ps4? I can already do it with a vpn, but i feel like my speeds will greatly improve with socks5.
Thank you for your heads up
I followed these steps but after assigned IP, I got reconnecting.. A remarkable problem is after reconnecting loops, system proxy configuration reset itself. I couldn’t manage this problem myself. Please give me a hint.
What OS? I guess Mac? I have only had success with this on Windows so far.
@James @JeanBon
I tried @JeanBon’s tips for my OSX El capitan. I assiged IP on tunnelblick but soon reconnecting happened. So I saw my system proxy setting, it was unchecked itself. Please give me a help how @JeanBon succeed on Mac.
Thanks
Hi, thanks for this great post.
I successfully managed to setup: VPN (TCP and UDP) ==> Shadowsocks (==> PPPoE) on MacOS.
I simply proxyfied all the network traffic to Shadowsocks directly from the network interface.
*Steps*
1/ Open the Shadowsocks client Preferences and under “Advanced”, select “Enable UDP relay”.
2/ Open your Mac network configuration select “Advanced” on the interface you are using (Wifi, PPPoE, Ethernet…).
3/ Under Proxys, select “Proxy SOCKS” and enter your local SOCKS proxy (127.0.0.1:1086).
4/ Make sure Shadowsocks Client is running and your VPN is connected.
5/ Open a web browser and enter “google.com”…
Hope this helps!
I tried it on my Mac OS Sierra virtual machine and it doesn’t seem to work. Following your method, it is tunneling shadowsocks over VPN, not VPN over shadowsocks. I want to connect first to the shadowsocks server, and then connect to the VPN from the shadowsocks server. There is no point to tunnelling a shadowsocks connection over a VPN, you can get better performance by just using the VPN without shadowsocks.